

In part 1 I discussed the types of hones that can be used for sharpening a straight razor. In this article I will go through the actual process of honing.
The Process of Honing:
When honing a razor regardless if you use whetstones, natural stones, or lapping film you must use a strategy that starts at a coarse level of abrasion which progresses to a finer level. Each part of the progression requires the razor to gain the maximum that stone can give before moving to the next one. In short if you start at a 1000 grit stone then you move to a 4,000 grit then to 8,000 then to 10,000 and so on.
The process of honing can take years to master. While you may be able to achieve a “shave ready “edge after some practice it will take much longer to achieve “your” edge. In this guide we’ll go over basic techniques that are proven to work for everyone.
Disclaimer: The honing techniques disclosed in this article are generic opinions. We understand that there are many other ways to hone a straight razor and we welcome all techniques. For the sake of time and argument, this article will contain the most popular methods that are proven to produce favorable results.
The process of actually honing a straight razor is a simple process but requires the “3 Ps” of wetshaving. “Patience, Practice, and Perseverance”. All skills require practice and honing a razor is no different. No matter how much you spend on your gear you’ll need a lot of “practice” before you produce a shave worthy straight razor. Honing a straight razor is a very tedious process and requires a lot of “patience”. You may fail several times while learning how to master the skill so that’s where “perseverance” comes in.
Remember the goal of honing a razor is to make the blade as flat and as thin without compromising structural integrity. Not honing enough will pull and tug while shaving and over honing will produce a wire edge which will need to be removed.
Ok, it’s time to get your gear out, let’s hone some razors!
Preparation:
When it’s time to set the bevel its common to see some guys take the edge and run it over the rim of a glass to destroy the microscopic fin that does the cutting. This creates an even surface that begins with the bevel and removes any obstacles during the honing process.
Next, you want to select the stone or similar abrasive (lapping film, ceramic etc.) that you‘ll use for this stage of the honing process. It’s strongly recommend to start out with the lowest grit rating stone in your honing progression. An abrasive with the grit rating of 800-1200 is recommend for the job.
Whether you’re using stones or films it’s important to set them up to where they won’t move while your honing. “A Bean bag or stone holder works well with stones”. You need a spray bottle of water to keep the stones/films lubricated while honing. At this point some guys like to tape the spine of the blade to prevent any unwanted hone wear. It’s not required, but has become a common practice today. To do this simply get a roll of black electrical tape cut it the length of the blade and wrap it around the spine. You’re now ready for the next step which is the most important setting the bevel.
Setting the Bevel:
This is the most important part of the entire honing process.
Bevel: The area of metal on both sides of the blade that progressively concaves as it leads to the microscopic cutting edge.
There is a gentleman over on SRP that wrote an entire wiki article on the different types of bevels you may encounter here. Let’s take a moment to go over them:
When you hear a fellow member speak of “setting the bevel” he or she means establishing the shaving edge. This is a timely process, and it will take 60-75% of the time dedicated to honing your straight razor. As previously mentioned you’ll need your 800-1200 grit stone/film for this process
Once you’re set-up it’s time to start. This is where it gets a little tricky. There are several strokes associated with honing. Let’s go over the most common technique the X-Stroke.
The “X-stroke” is a method of bringing the edge of the blade over an abrasive surface in a varying sequence which closely resembles the shape of an “X”. (This method is only used for stones that are under 3 inches in width)
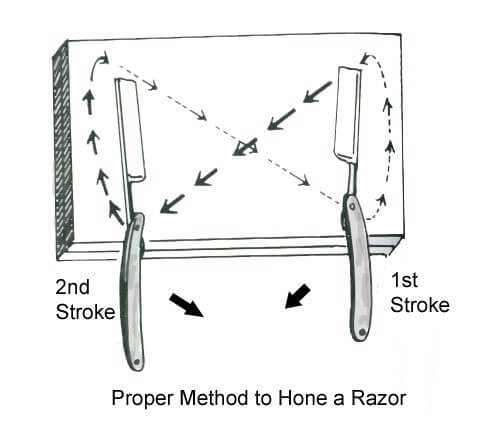
It’s very important to do slow even strokes with this method. Uneven strokes will form an uneven bevel defining the “smile or frown” shape. While the x-stroke was very common practice in yesteryear (hence the many smiling/frowning blades you’ll find on eBay) it is not necessary if you’re using a more modern hone that’s 3 inches wide. Check out this video that shows you both methods:
Smiling or Frowning bevel is a result of improper honing technique, resulting in more metal being removed from different parts of the blade thus leaving a “smile” or “frown” shape.
During this process it’s very important to keep your stone or similar abrasive lubricated with water to prevent clogging and to help the razor glide over the stones.
Make sure the razor is placed completely flat on the stone/abrasive so that the spine and edge are both in contact with it. Raising the spine will only result in a short non-functional bevel that will not deem shave worthy. Place your index finger at the toe of the blade to help guide it and prevent the spine from lifting up. Remember no pressure is needed. Let the stone do the work and be patient.
After about 50 or so laps (back and forth passes) you’ll want to check your progression. One of the most effective ways to check a bevel is with a microscope. Under the scope you’ll notice the ridges disappearing and the edge becoming straighter. If that’s happening then you’re going in the right direction.
Now a microscope may not be in everyone’s budget but luckily there are ways to check your progression without adding any more expense.
The first method and probably the most effective is the “arm hair test”. This is performed by simply shaving arm hair. If the hair comes off cleanly then you’re making progress. If you can lift the blade and cut hair without the blade touching the skin then the bevel is set and it’s time to move on.
Another method that works is the “cherry tomato test”. Simply take a cherry tomato and slice it with your blade. If it cuts right through and doesn’t tear the skin then you’re set.
The “thumb pad” “and “finger nail” tests are popular, but can be a tad dangerous for the beginner so please use caution. The “thumb pad test” is performed wetting the surface of the thumb and dragging the blade over the surface much like with checking knife sharpness. If the blade lightly tickles you then you’re going in the right direction. If it pulls and feels like a sharp kitchen knife then it needs more work.
The “fingernail” test is performed by lightly drawing the edge of the razor over your fingernail. If it passes cleanly over your nail just cutting it slightly then you’re in the ballpark. If it glides over and doesn’t dig in then you have some work to do.
Once your razor has passed on the bevel set tests it’s time to move on to the next step.
Establishing the edge:
Once the bevel is set you’re more than half-way there! Now it’s time to establish the keenness of the edge. You need your next set of stones/abrasives. Most recommend abrasives in the ballpark of 4000-8000 grit.
Use the same technique used when setting the bevel light strokes light pressure. Start with the 4000 stone/film and check it every 25-35 laps. There’s another method to checking your progress at this stage in honing and yes you guessed it ….its controversial!
The “Hanging Hair Test” or better known as the “HHT” has been used for years when determining sharpness for straight razors. This test is performed by taking a single hair by the root end in your hand. Then take the hair and gently bring it to the edge of the blade roughly a ¼- ½ inch from your fingers. If the hair “pops” cleanly then you’re ready to move on to the next stone. If it “sings” or cuts the hair partially you’ll need to continue.
Once you’ve established that you’re blade is ready to progress, it’s time to hit the 8000 grit stone/abrasive. Using the same technique as the previous steps hone the razor and check it every 20-30 laps. Now when you perform the HHT you notice the hair popping cleanly and almost effortlessly. It’s time for the final step.
Final Polish:
Now it’s time for the final polish. In this stage you’ll want to use your finest stones/abrasives. Something along the lines of 10,000 grit works well. Many natural stones, work great here.
You’ll use the same honing technique as the previous stages and its good practice to check the edge every 25-30 laps. Use the hanging hair test to determine if the razor is sharper then the previous stage. The hair should pop very cleanly with barely any effort. Once your razor establishes that it’s time for the one and only test that’s truly proven. The shave test.
The shave test is just that…shaving with your razor. Make sure to strop before shaving. If the razor tugs, pulls makes you tear up (you know what I’m taking about) then back to the hones you go. If it’s a comfortable shave and you feel good then you succeeded!
There are many guys who like to enhance their edge with pasted strops. You’ll remember in “The Guide to Straight Razor Strops” we discussed the different methods and materials associated with pasted strops. It’s all about choice at this stage. Many shave right of the stones/film and many used pastes. It’s what works for you!
One Stone Honing:
There is a way to hone a razor with one stone. This method was briefly described in the “coticule” section in this guide but the method will work with Japanese Naturals, and German Thuringians as well. Utilizing one stone for your entire honing progression takes some practice but does work and will produce a fantastic edge.
To start you’ll need a natural hone, and a smaller piece of the stone which is often referred to as a “Slurry Stone” a “Rubber Stone” or a “Nagura”. Wet the stones with clean water and gently rub the stones creating a slurry. Start out with a heavy slurry and hone in the way previously mentioned in “The Process of Honing” section of this article.
Dilute the slurry with more water as you progress all while checking the edge as you go until you’re using straight water. Don’t forget to stop!
Damaged Razors:
Working with damaged razors throws another loop in the equation. A “damaged edge” would be one that has chips, rust or uneven bevel. These razors may require more tools and more patience. It’s very important to assess damaged razors before repairing them. If the damage is severe it’s time to make the decision whether or not the razor is salvageable. Repairing severely damaged razors can take hours to repair. Always consult a mentor if you’re unsure of any repairs.
Conclusion:
As you progress through your honing endeavors you’ll find your own particular method that you’ll find works for you. Don’t be shy with sharing your results. The old saying that there are many ways to skin a cat is very true when it comes to straight razor honing. As long as you’re happy with the results and achieve enjoyable shaves then you’re successful.
About the author:
Joe Borrelli is a long-time wet shaving enthusiast and collector. He recently joined the “Wet shaving News” podcast as a co-host/contributor and started his own self-funded website http://shavestraightandsafe.com/ to help inform the community of new information involving the wet shaving world. Joe holds a BBA from Florida Atlantic University, and currently works for the nation’s largest wine/spirits/beer retailer. In his spare time, he enjoys traveling with his wife Linda, outdoor activities and collecting wet shaving apparel.

Thanks for the detailed instructions
Comments are closed.