

After a recent shaving session, you may have observed that your safety razors exhibit signs of wear and buildup. Proper maintenance is essential to ensure longevity and optimal performance. In this article, I will provide you with effective guidance and techniques for cleaning and maintaining your safety razors, restoring them to their optimal condition.
The good news is safety razors usually don’t require a lot of maintenance, although butterfly-top (twist to open) razors may require more work if the mechanism is binding. A bit of light maintenance here and there once a month will leave them looking good as new.
Quick Answer
Safety razors need light but regular maintenance. Remove the blade, clean with a soft toothbrush and mild polish or soap depending on the metal, avoid ultrasonic cleaning on plated finishes, and apply a small amount of petroleum jelly to the threads monthly. Proper cleaning and lubrication prevent corrosion, thread wear, and mechanical failure.
Polish it Up
Before we begin, and in case it isn’t absolutely obvious, please remember to remove the blade from the razor prior to any cleaning operations. We wish to create shiny razors, not generate unnecessary injuries.
The fastest way to clean your shaving equipment is using an old toothbrush and toothpaste or Flitz metal polish. Flitz is relatively nonabrasive and will thereby not erode protective chrome coatings, plus it also has a deoxidizing agent built into the ingredients for building up a vibrant shine. For regular stainless razors Flitz works like a charm, plus it also leaves a very thin protective coat on the metal surface, although this may wash away with your first shave.
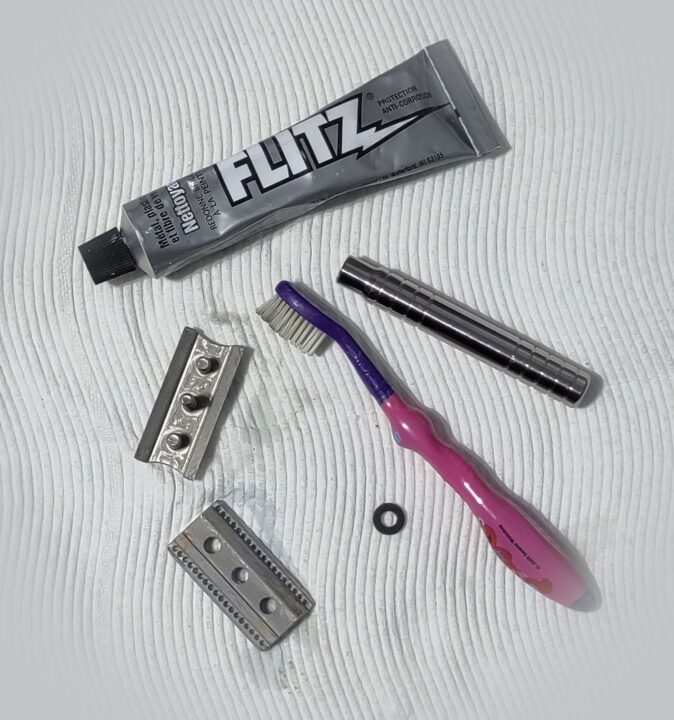
This chore is faster and easier if you have an electric toothbrush with a dedicated, used toothbrush head set aside just for cleaning operations. A bit of friendly advice here: use a black permanent marker to mark the backside of the designated razor cleaning toothbrush so you don’t get it confused with your regular toothbrush, assuming they are kept in the same vicinity.
When polishing with Toothpaste or Flitz, be careful not to get any of these compounds on the threads of the cap if possible. You may wish to also entirely avoid polishing the underside of the razor cap for this reason, although I consider this somewhat paranoid. It is certainly not the end of the world if you accidentally smudge a small bit there; just be sure to quickly wipe it off with a soft cloth. I also suggest gently gripping the threads with a soft tissue between two fingers then spinning the razor cap away from you. This will clean out any residue or gunk at the bottom troughs of the threads.
Stubborn rust stains are brought on by galvanic reaction between the dissimilar metals of the in the presence of water. Usually this is just surface level corrosion. Some light scrubbing with your toothbrush will make this go away.
The rarer razors made from brass, bronze, or copper ought to be polished with Brasso, Twinkle, or equivalent, assuming you don’t mind removing the natural patina. Titanium can be cleaned with Flitz since it is rarely anodized; if anodized, use soap and water only. Anodized aluminum should also be cleaned with soap and water only.
Ultra Clean with Ultrasonic Cleaners
Although optionally suggested if you have a unit handy, my favorite cleaning method for CNC machined stainless steel razors is to use an ultrasonic cleaner. These can be purchased cheaply from Amazon, Harbor Freight, or sometimes your local hardware store. I like this approach because it is “set it and forget it” after you disassemble everything.
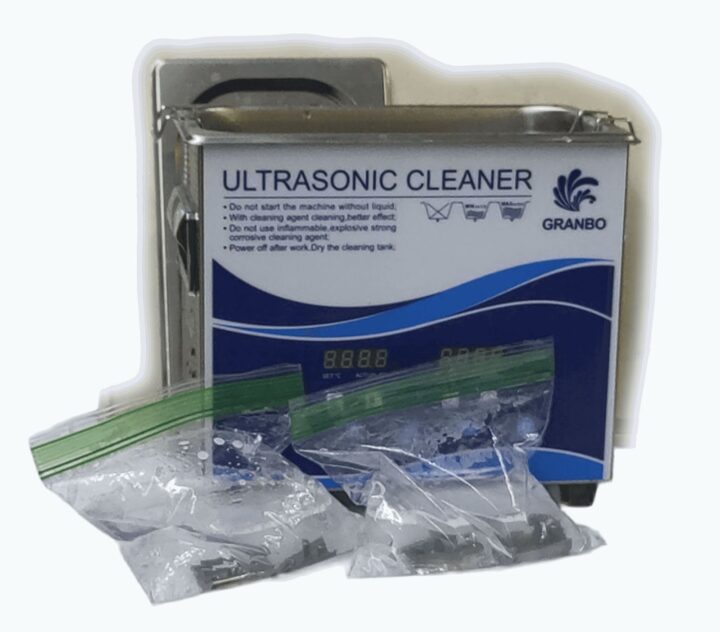
When doing an ultrasonic cleaning I prefer to disassemble the razor head entirely, then put the parts in a small plastic resealable bag filled with filtered water and a small dollop of dish soap. The bag keeps the metal parts from clanking into the walls or wire tray when the cleaner is running. I run the cleaning cycle for 3-10 minutes, sometimes with the added heat cycle activated should I wish to improve cleaning and disinfect better. The result is the shavers come out exceptionally bright and shiny, as fresh as they were when they were delivered to you brand-new straight from the factory. A little rinse off and cleanup work when done, and your razor is now showroom ready.
NOTE: Do not use this ultrasonic cleaner on any kind of plated razors at all. This includes chrome plated, nickel plated, gold plated, rhodium plated, color plated, or anything similar. Such ultrasonic cleaning on these razors can cause the pleading to flake off from the razor body, which will expose underlying metals to corrosion.
Cleaning One Piece Razors
Twist-to-Open (TTO), adjustable, or “Butterfly” One piece razors ought to have a slightly different cleaning approach. Because of the closure mechanism located inside the handle, disassembly is impossible without special tools, depending on the model.

The solution here is to place the razor in boiling water for about five minutes, which will loosen up and dissolve any built up gunk inside the assembly. After that you can proceed with a little bit of toothbrush work like we’ve described above.
Save the Razor Threads with Proper Lubricant
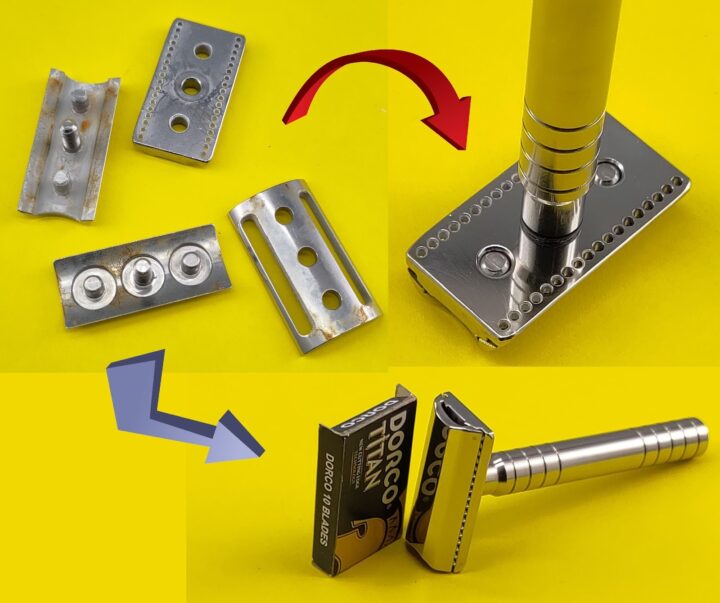
Two of the most frequent causes of failure or breakage of your safety razor (aside from dropping) are over-tightening of the razor handle, and no lubrication on the threads. Both of these are easily preventable.
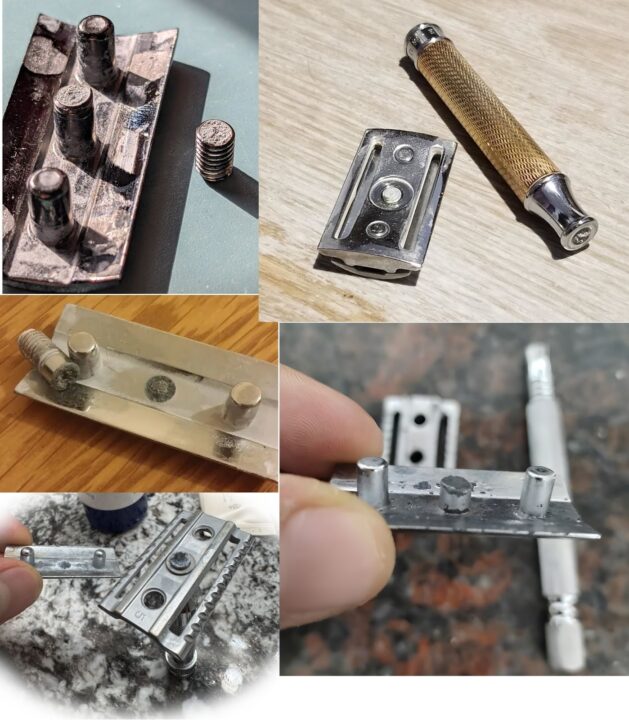
For starters, you need not over tighten the razor head assembly with any more torque than is required to snug everything down. You should be gentle here; you do not need to wrench the handle on with such force that you need some channel locks and a vise to disassemble everything. On chrome-plated Zamac (die cast zinc compound) razors, extreme torque will cause the plating to wear off the threads absent any lubrication, and thereby cause corrosion on the underlying metal. This in turn causes the breakage you see pictured above. All you need is enough gentle force to ensure the razor doesn’t spin apart while you are shaving.
That aside, when you are done with your scrubbing and cleaning, it is time for a little bit of preventative maintenance: petroleum jelly. Proper lubrication here will all but eliminate thread wear, and save you money by eliminating the need to replace your expensive razors. A small dab of petroleum jelly (or Vaseline if you prefer) should be applied every month or two. You can use a toothpick to apply them to the threads and then assemble everything. Be sure to wipe off any excess.
I am usually not in favor of mineral oil on any razor threads because it tends to wash away during the shave operation, and shave soap will naturally degrade exposed light oils. The exception to this is lubricating single piece razors, which we discussed cleaning above. With TTO razors it is necessary to apply a few drops of mineral oil down the center hole where the lift arm for the butterfly doors goes down into the handle. This should keep that mechanism running smoothly for a while. Repeat this any time the mechanism doesn’t open and close smoothly or it feels like it is binding or grinding.
Some Closing Cleaning Thoughts
How often should you go about cleaning your precision shaving instruments? As often as you like. Any time you feel annoyance building up at the foggy surfaces on your razor, or you are preparing your razor for a big sale or photography event is the perfect time to get to scrubbing again.
A simple bit of regular cleaning will keep your razors looking great, prevent critical damage, and keep them shaving well for a lifetime.

Thanks for the great tips Mark. It was a good article. I appreciate the cautionary advice also.
Good advice here, I clean my 1950’s Gillette Tech with toothbrush and liquid hand soap at every blade change, but to date, I have never lubricated the thread and it still tightens up ok. Also good points on cleaning up razors, especially vintage ones, these razors are bullet proof, so never throw a vintage away, no matter how bad it looks, these razors can be resurrected with a bit of work!
I don’t baby my razor! It’s just for shaving the hair off my face no big deal. And they’er so cheap, damn just shave everyday no biggie! Come on there’s more important things to do everyday. No big deal!
Cast alloy razors are inexpensive and can shave well for a while then they corrode. I have found that the two piece Merkur 34 gold plating is less durable than their silver colored plated razors. After a few years, started to corrode where the threaded post was attached to the head. However, they can then be easily replaced at low to moderate cost. I tried an expensive Merkur Vision one piece adjustable razor. The adjustment range decreased over time due to internal corrosion of inaccessible parts. It initially shaved well, but became a disappointment because of the internal corrosion. The Vision is no longer made.
It takes me less than two minutes to loosen the butterfly doors, rinse under very hot water, remove the blade, blow off the water droplets from razor and blade, then reinstall the blade. This simple maintenance keeps my razor looking clean and prevents corrosion. My Feather blade shaves OK for about a week, then needs replacement. This is far less expensive than buying boutique name brand multiblade disposable razors and can be comparable to the cost of using bagged plastic disposable razors. My shaving brush and cake of boutique shaving soap performs well and lasts for weeks.
I use a 1949 Gillette Superspeed, my birthyear razor. I rinse the head under hot water after every use and then blow or wipe the water and residue off the razor and Feather blade. It still looks good after 76 years and just keeps shaving along. I also have a Gillette “slim adjustable” that is the 1060s era razor I used when I started shaving. It also looks good and works well. I have had problems with plated alloy over base metal one piece razors. They may initially shave well, but cannot be taken apart and eventually corrode internally after their plating wears off. Solid stainless could be different. Its hard to beat Gillette’s plated brass razors for their performance and durability.
That’s pretty much my method. I use a razor 7 days/shaves. Clean with oxiclean spray. I always use the wife’s toothbrush for any cleaning project!!! I laughed at the wrench the handle on! I remember reading a review on a Merkur 1904/1906. “I had the head clamped in my vice, using a wrench to tighten the handle. The “bolt” thing broke off!!” Then the guy complained about it! Then blasted the seller for not replacing the defective product. Well, HERE’S YOUR SIGN!!