


If you’ve shaved or currently shave with a straight razor, chances are you’ve used a vintage straight razor. They offer a great value when compared to new razors, and add a touch of nostalgia knowing that you’re using a tool that was last used 50-100 years ago. Many hobbyists have tried their hand at restoring vintage blades, but there are only a few that offer the service professionally. That brings up the question, “Are Vintage Straight Razors Worth Restoring”?
What Are You Looking For?
To answer that, it’s important to establish what exactly you’re looking for in your straight razor. Would you like a functional razor that shaves well and may not look that great? Or are you looking for a truly original piece that looks like it was just sold from the showroom? Maybe a custom piece that’s one of a kind? Are you looking for this razor to be valuable, or just usable? Do you have a family heirloom that you want to pass on? Do you want to restore razors as a hobby or profession? These are the questions you need to ask yourself as the needed tools, time and ability all play a factor with the desired outcome.
Types of Restorations:
Whether you decide to do it yourself or have a professional restore your razor, it’s important to decide what type of restorations are available.
I like to consider three options.
- A Shave Ready, Functional Razor:This option lacks any frills, but is perfectly functional for everyday use and will be shave worth for years to come. Reusing old, or purchasing cheaper plastic scales would be included and the polish of the razor will not be “mirror finished “. There may be some imperfections in the blade (such as pitting, dings and scratches) but overall clean and rust free. Most of the restoration time will be focused on honing (sharpening the edge), Minimal investment needed in tools and time.
- Full On Restoration to the Original Form: This requires more tools and more time. If the scales are restorable, then they would need to be refinished. If they are not salvageable, purchasing of a like material may require custom shaping. The blade will require a “mirror polish” which takes time and lots of effort and also may or may not need to be reground. This requires a larger investment of tools, time and effort.
- Custom Restoration: Requires more imagination and planning to make your design become a reality. The sky’s the limit with ideas and based upon your desire, will require more time, and more tools. Most DYI’ers like to toy around in this area with cheaper Chinese razors (such as Gold Dollars see image for mine) but it’s possible for vintage examples as well.

Choosing a Razor:

It’s important to mention that not all razors are created equal in the world of traditional wet shaving. Once you’ve decided you’re ready to proceed with the restoration it’s time to get a razor.
Now you may already have a razor (could be a family heirloom or one already in your collection), so if that’s the case you can move on to the next step. If you’re starting from scratch, there are a few things to know before you purchase a razor.
- Avoid any razors made in the Middle East, India and China. (These razors tend to need more work and do not have a good reputation as being shaveable. Stick with razors made in Germany, England, USA, Japan, Spain and France.
- Do not purchase a razor with excess hone wear on the spine and blade. These blades have been used alot and will need more work to make them work.
- Carefully examine pictures for cracks in the blade and rust. If there is the slightest crack in the blade, then the blade is done.
Can I Restore it Myself?
[Ed. Note: Amazon links are Sharpologist affiliate.]
The short answer is…YES! Restoring a straight razor can be a very rewarding experience. It can also be very time consuming and require some initial investment. If you’re already handy with tools, then you’ll be more comfortable in this situation. If not that’s ok, you’ll need more patience.
Shave Ready Functional: As previously mentioned, this is the no frills ,this is the no frills method of restoration. You’ll need the following:
-Wet-Sandpaper: 100,300, 500, 1000, 1500, grit
-1/18th copper tubing (If removing the scales)
-Small 4oz. ball peen hammer. (for setting scales)
-Small cutting pliers for removing scales.
-1000, 4000, 8000, 10,000 grit wet stones. (250 & 500 may be required if the blade needs significant work)
Full Restoration/Custom:
–Sandpaper 100,300,500,800,1000,1500,2000,2500,3000 grit
–Set of honing stones: 250, 1000,4000,8000, 10,000 etc. ( All depends on your preference)
-Pasted Strop (optional)
-Metal polish Several different abrasions and buffing wheel
-Small ball peen hammer. (for setting scales)
-1/18th copper tubing (scales)
-Table Bandsaw (if you plan on making your own scales)
Restoration Process:
Realistically, restoring a straight razor will take time. Even for the professional restorer, you’re looking at hours upon hours of work. It all depends on your vision. There are a few steps that I personally like to follow. The first is repairing damage to the cutting blade, wet shaving the blade to the desired shine, next polishing the blade, then rescaling the razor with a new handle and finally honing the blade to shave ready status.
Damage Repair

If there is a chip or damage to the cutting edge it will need to be addressed before moving on. regrinding may be required. A chip will require re-grinding the blade to give it a completely new cutting edge.
This can be done with a variety of cutting stones, or by bread knifing (process of taking the edge and grinding it on the side of a coarse wet stone until the damage is removed and the blade is even). Once the blade is even, it’s required to set the cutting edge (see honing section)
Wet-sanding

The amount of time required can vary, as there are a lot of factors and every razor is different. You’ll need to spend a lot of time sanding the blade to get the polish just right and most pros will tell you they spend the most amount of time during this process.
When wet sanding, it’s important to spend the proper amount of time sanding the blade before moving on. If there is rust or pitting on the blade it’s important to make sure it’s all removed before moving on with your restoration. You always want to start with the lowest grit, continue to sand until you can no longer see swirl marks. Once the swirl marks are gone, you can move up to the next grit. Don’t forget to continually use water throughout the process.
Example: Say you are sanding with 1000 grit sandpaper. Once you start, you’ll notice a bunch of swirl marks on the blade. Continue sanding (always remember to keep the blade and sandpaper wet hence the term wet-sanding) until the swirl marks are no longer visible. Then move on to 1500 grit, then 2000 and so on. After each grit, the blade will get shinier and shiner until you achieve an almost mirror-like shine.
Although extremely time consuming, the process does work and the results can be amazing! Just remember, it’s to your preference. If you are not looking for a mirror polish shine, then you can save some time here.
Polishing
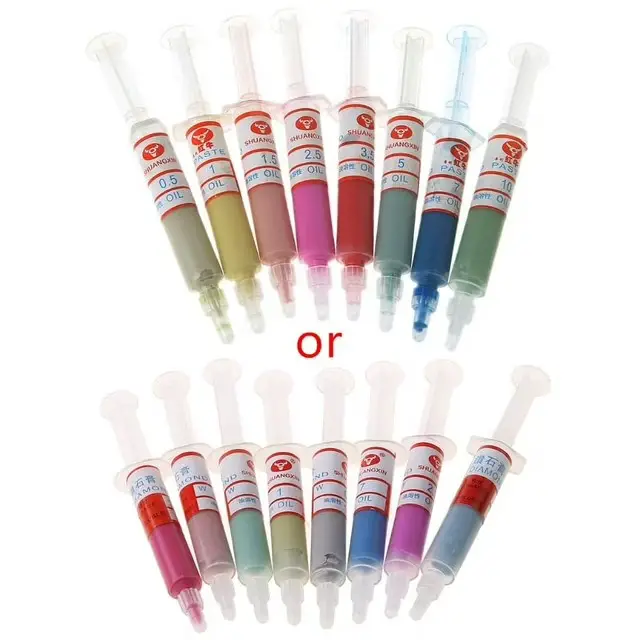
The next step is to polish the blade. This removes a very small amount of metal but will really enhance a mirror polish. Professionals use different wheels with different levels of polish which are identified by grit and color. In the same process as wet sanding, you’ll start with the lower grit (at this point we are measuring in microns) and move up to the highest. The amount of time will vary but not nearly as long as the wet sanding process. I recommend starting with a 3 micron paste (8000 grit) and moving up to a 1 micron ( 14,000 grit) paste. Once it is fully polished it’s time to rescale the razor.
Scale replacement:

Whether you’re making your own scales or just replacing them, the installation process is the same.
Making scales from scratch requires some shaping and cutting which can vary and is self explanatory, so we will omit that step for the sake of this article. Installing the scales are the same with custom or pre-fitted scales.

Installing scales requires several tools. A small ball peen hammer, ⅛ inch copper tubing (found at a hobby store or online) , and some #00 washers.
The first step is to take both sides of the scales and put them together so that they are perfectly fit almost as one piece. Take a piece of painters tape and tap them together so they do not shift.
Next, take your copper tubing through the hole and cut them leaving about 1 inch in length. Take the scales and rest on a piece of metal ( an anvil or flat part of a metal vise) Fit your washer over the tubing on the side you want to attach first. Carefully cut excess tubing until it’s about ⅛ of an inch over the washer.
Finally, gently tap the tubing until it covers the washer. Take your time here. Once fitted, turn the scales around and repeat. File or sand off any excess tubing. That’s all there’s to it!
Note: When making your own scales you’ll need to drill out the holes, and fit a wedge at the end of the scales. There are many kits that use multiple washers, special nails instead of copper tubing etc.
Honing (Sharpening):

Once you have the blade together, and it’s nice and shiny, it’s time to get it sharp. Bring out your wet stones and let’s get started.
Note: There are many ways to hone a razor. For the sake of this article only one basic way is being used. Please refer to The Guide to Straight Razor Honing Part 1 and 2 for more information.
What you’ll need:
- 1000, 4000, 8000, 12000 grit stones
- Water
- Cherry Tomato
- Hair to test blade
There are a few steps in honing a razor. We’ll go over the basics. Setting the bevel establishes the cutting edge, then moving up in grits (similar to the wet-sanding process discussed earlier):
Setting the Bevel 1000 grit stone: This is the first and most important part of the honing process. You’ll spend the majority of your time here. Start with your 1000 grit stone and go back and forth in an “X” pattern for several minutes. Keeping the stone wet, continue this process until your razor is sharp enough to cut arm-hair.
4000/8000 Grit Stone(s) : After your razor successfully cuts arm hair, repeat the same process with your 4000 grit stone. X-pattern back and forth until the razor is sharp enough to slice through a cherry tomato without ripping the skin. It should just cut through with ease and a clean cut. Proceed to your 8000 grit stone, repeating the X-pattern strokes until your razor can cut a single strain of hair but lightly tapping it to the blade. (This is called the HHT Hanging Hair Test and is explained in The Guide to Honing)
Finisher(12,000 grit stone) : Similar process as the above, x-strokes until the razor can cleanly“pop” hair off the edge of the blade. The final polish can take a few minutes but it’s extremely important as this will make or break you in terms of comfort when shaving. Once your razor is popping hair as soon as it touches the blade you’re good to go.
Having a Professional Restore Your Straight Razor:
If you find that you’re not cut out to restore it yourself, then there are several professionals that will be able to do it for you. Depending on the model, amount of work required and your vision, prices can vary from as little as $200 to over $1000 for a custom restoration. It really all depends on your vision and what you want out of it.
If you do decide to go with professional restoration, then expect it to take several months, as work like this takes time and it all depends on what the professional already has on his or her bench. Most supplies are not readily available so the professional may have to place orders which will take even more time.
Overall Value:
This is a question I have received via my podcast several times over the years in regards to all things vintage shaving.: “What is it worth?”
As with everything it’s worth what someone is willing to pay, but there are certain models that do bring some value.

8/8 Wade and Butcher “For Barbers Use Only”: One of the most valuable razors out there. The value on these razors go up substantially with restoration. Expect it to be worth $1k+ after full restoration
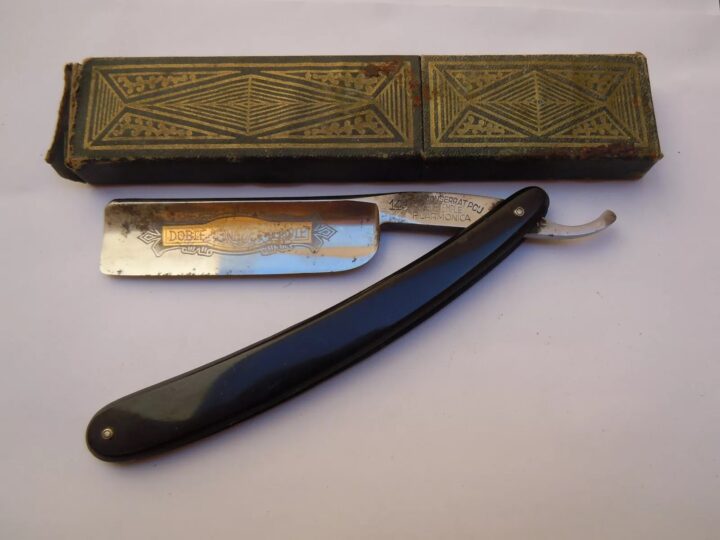
Filarmonica: Beautiful razors from Spain fetch a decent amount in auctions across the board. Great shavers and mildly rare. Value $400+

John Barber 1800s: These razors take well to restoration and are very valuable. From a maker in business during most of the 19th century this is one of the only pre-20th century razors I would recommend a full on restoration.
Conclusion: Is It Worth It?
The obvious answer here really depends on the person and their situation. A well honed vintage razor will perform just as well as a restored one so it all really depends on personal preference. Just like with all hobbies (vintage cars, watches, fountain pens) , restoration can be costly and doing it yourself can be a large investment in time and tools.
In terms of value, yes your new razor will be more valuable, but unless it’s a particularly rare and/or in demand model, it won’t be the ticket to your early retirement. Remember it’s only as worth as much as someone is willing to pay for it.
Overall, if you look at it purely in a financial sense, your best bet is to purchase a new straight razor from a reputable manufacturer. You’ll be ready to go right out of the box and it will save you a lot of time and money. But if your passion is to make what was vintage new again then there is no price on happiness.

Agree with everything said in the post. As I live close to the city of Sheffield, England, I’m kind of biased towards vintage razors made there and own half a dozen. None of them valuable, but I enjoyed restoring them and they all shave me just fine.